Troubleshooting issues with the Back of Truck System (BOTS/TruckSiS) label printer
Is your TruckSiS label printer not working like it used to? Is it spitting blank labels or not even turning on? Walk through this troubleshooting guide to get get you back up and working.
If your label printer is printing one label, and then a blank second, you need to recalibrate it.
To calibrate the Zebra ZD420
-
Make sure that the media and ribbon cartridge (if printing in thermal transfer mode) are properly loaded in the printer and that the top cover of the printer is closed.
-
Press the POWER button to turn on the printer
-
When the printer is ready (fixed Statoverde lamp), press and hold the PAUSE and CANCEL buttons for two (2) seconds, then release them. Refer to the following image:
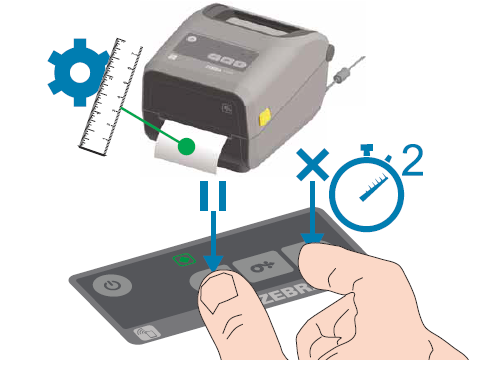
-
The printer should dispense 1 blank label. Run a test label to find out if this adjustment fixed your issue.
If this did not fix your issue, you may need to reset your label printer.
To perform a Reset Printer Factory Defaults procedure:
- Turn OFF the printer.
- Press and hold PAUSE + FEED while turning ON the printer.
- Hold PAUSE + FEED until the STATUS indicator ( ) is the only indicator lit. The printer configuration is reset to the factory default values. No labels print at the end of this action.
Another option to reset your label printer:
- Locate the reset access button (very small and thin, you may want to use a paper clip to access) Button is on the bottom of the printer, see image below.
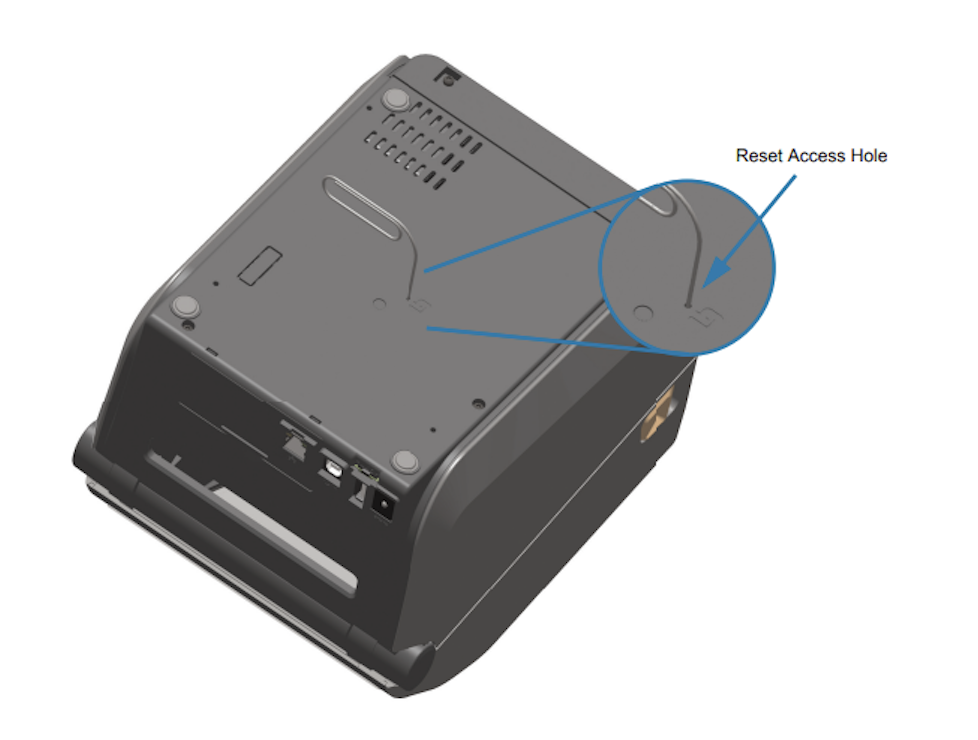
- Hold the reset button down for1-5 seconds- Printer performs a factory reset and will automatically
print a configuration label (and network label if present)
Zebra GK420
Reset the Barcode Printer to Factory Defaults
- Ensure the roll of labels has been correctly installed and aligned. The Status LED should be Steady Green.
- a. Status LED is on the top of the printer in the bottom right corner.
- REMOVE the network cable from the back of the printer.
- Press and hold the Label Feed Button for 4 flashes then release.
- a. 4 flashes would be 1 flash, 2 more flashes, 3 more flashes and then 4 more flashes for a total of 10 flashes.
- The LED will then turn Amber or Red for a 3 second window. At this point, Hold the Label Feed Button Down (the LED will turn green) for 1 Flash, then release.
- Wait for the LED to cycle through red and green.
- Once the Green LED remains steady on, press the Label Feed Button through 1 flash then release. This will initiate a “Printer” and “Network” Configuration label Print. All IP addresses except the Subnet Mask Will all be 0’s.
Video on how to reset
Printer is Still NOT Printing
Symptoms are 1 or more printers may not be printing. The built-in diagnostic on the BOTS will not print a test page for the dot-matrix or label printer.
- Be sure to load paper into the dot-matrix printer and attempt to print a test page.
- If neither printer will print a test page then most-likely the hub is disconnected or malfunctioning.
- Locate the hub underneath the BOTS just above the toolbox.
- Follow the 6inch round black cable from hub to extension cable. The hub might have become disconnected from the extension cable and just needs to be plugged back in. This may require taking the backplate off of the BOTS.
If the hub is connected then it may be malfunctioning. All devices may be unplugged and plugged back in to attempt to ‘reboot’ the hub. If the issue still persists then escalate to support.
If after following these steps the printer is not fully functional, please contact Smarter Sorting support.
Still stuck? Contact support or email support@smartersorting.com Either way it lands straight in our ticket queue.