Dot Matrix printer re-alignment and how to load paper
Need to load paper into your TruckSiS dot matrix printer? Are you having issues and need to re-align?
Print setting / Loading paper into dot matrix
- Make sure the printer is turned off.
- Set the paper release lever to the rear push tractor position.
- Release the left and right sprockets by pulling the blue sprocket lock levers forward.
- Slide the right sprocket (illustration shown below) approximately 12 mm (0.5 inch) from the far position and push the blue lever back to lock in place. Then slide the another sprocket to match the width of your paper, but do not lock it.
* approx. 12 mm (0.5 inch)
The triangle mark on top of the printer indicates the point furthest to the left where printing can begin. - Make sure your paper has a clean, straight edge. Then open both sprocket covers and fit the first four holes of the paper, with the printable side down, over the tractor pins.
- Close the sprocket covers.
- Slide the right sprocket to remove any slack in the paper; then lock it in place by pushing the blue sprocket lock down.
- Turn on the printer. When the printer receives data, it automatically loads the paper and starts printing.
Re-aligning and troubleshooting:
You will need to complete:
- A horizontal adjustment for items that are off wither right or left on the page
- A vertical reset
Horizontal Adjustment
The only method to adjust horizontal printing is to move the sprockets. There is a small blue tab under the clamp that holds the paper. Push this down to unlock and push it back up to lock.
Text printing too far right
- If the text is printing too far to the right of on any template paper, move the sprockets to the left (close to you, further from the TruckSIS monitor)
Text printing too far left
- If the text is printing too far to the right on any template paper, move the sprockets to the right (away from you, closer to the TruckSIS monitor)
Tip: Measure the distance that the printing is horizontally off to determine amount of adjustment needed.
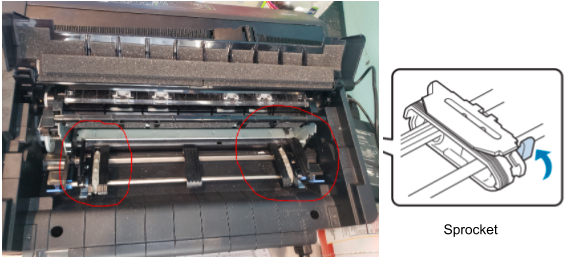
Sprockets are under each of the 2 clamps that hold the dot matrix paper on either side
Vertical Adjustment
If text is printing too high or low on the page, the top of form position can be reset.
- Remove any paper from the printer.
Any paper still in the printer will not be adjusted.
- Turn off the printer and make sure all lights go out.
- Hold down all 3 buttons in the white box while turning the printer back on. Keep holding until you hear a beep (about 5 seconds) and the printer starts churning. Once you hear the beep, you can let go.
- Load/Eject
- LF/FF
- Pause
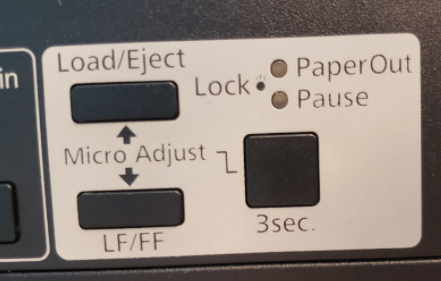
- Load paper into the printer. Printing should now be vertically reset.
If you have any questions, please reach out to support at Support@smartersorting.com or give us a call.
Still stuck? Contact support or email support@smartersorting.com Either way it lands straight in our ticket queue.