Back of Truck System (BOTS/TruckSiS) User Guide
TruckSIS User Guide
Getting started
Welcome to the TruckSIS!
Once the TruckSIS hardware is installed you are able to participate in remote training. Please contact your Republic service center manager for details on remote training if you do not have a training time set.
If you feel comfortable exploring the TruckSIS before training, try to create an account and access the Training Trip.
To learn how to create an account, login, and start processing retail generator pickups you can reference this printed User Guide.
You can also access User Guide content and videos in the Help section on the TruckSIS.
Connect your Republic cellphone to the TruckSIS wifi.
The network and password are provided on a sticker on the TruckSIS cart column. You will need to be connected to wifi in order to use the TruckSIS mobile app.
Download the Mobile App
After creating an account, an email will be sent to your Republic email address provided with a link to download the mobile app. We’ll go back to the TruckSIS cart and use the phone later.
TIP: If the monitor is off, you can turn on the monitor using the power switch behind the monitor on the bottom left.
TruckSIS User Guide
Account creation
- Create a new TruckSIS account
- Download TruckSIS Mobile App
- Create a new account
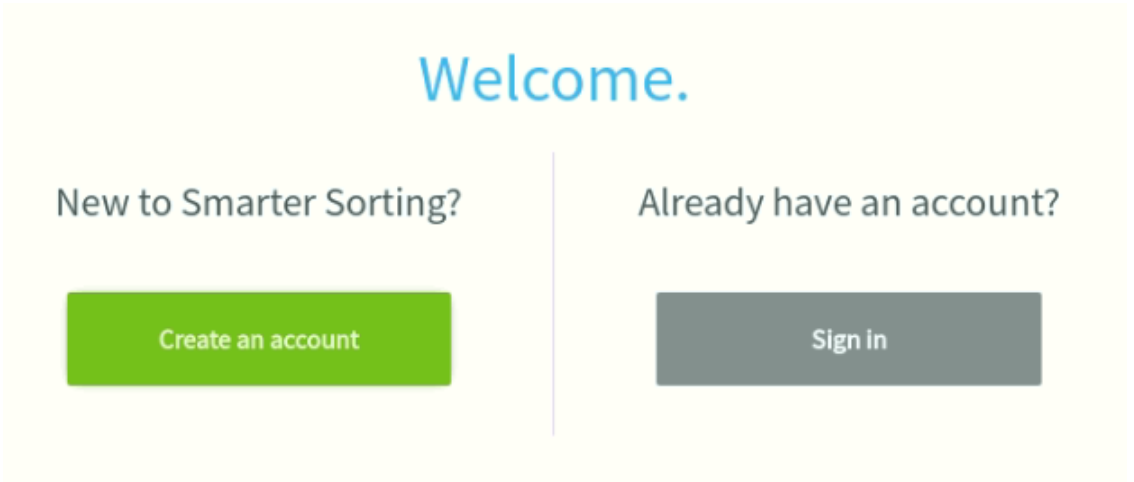
The TruckSIS welcome page opens on start up.
-
Select Create an account.
-
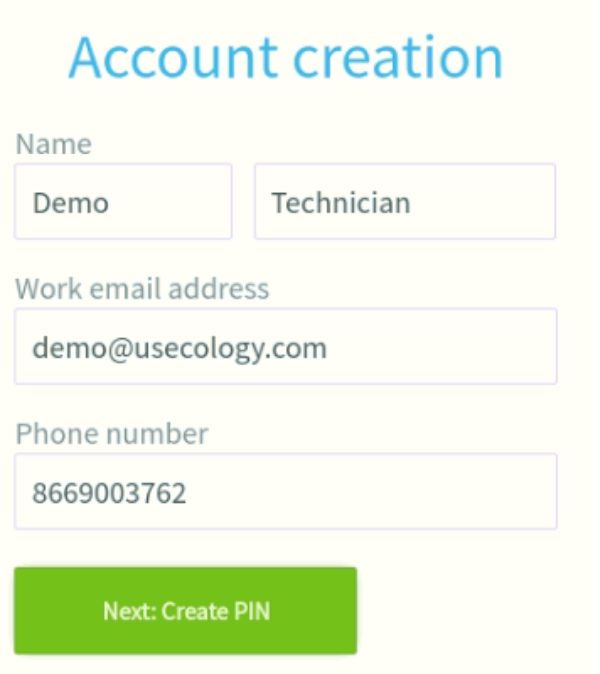
Enter your first name, last name, work email address (use either @Republic.com (formerly US Ecology) or @eqaionline.com), and work phone number. Select Next:Create PIN once complete.
-
Create your unique 4-digit PIN using the keypad. Once complete, select Next: Confirm PIN to re-confirm the 4-digit PIN and create your account.
-
Upon initial login, you will be taken to the My trips screen and an email will be sent to your work address with instructions to download the TruckSIS Mobile App.
Download TruckSIS mobile app
You can login on the mobile app with your TruckSIS account. To download the TruckSIS Mobile App:
-
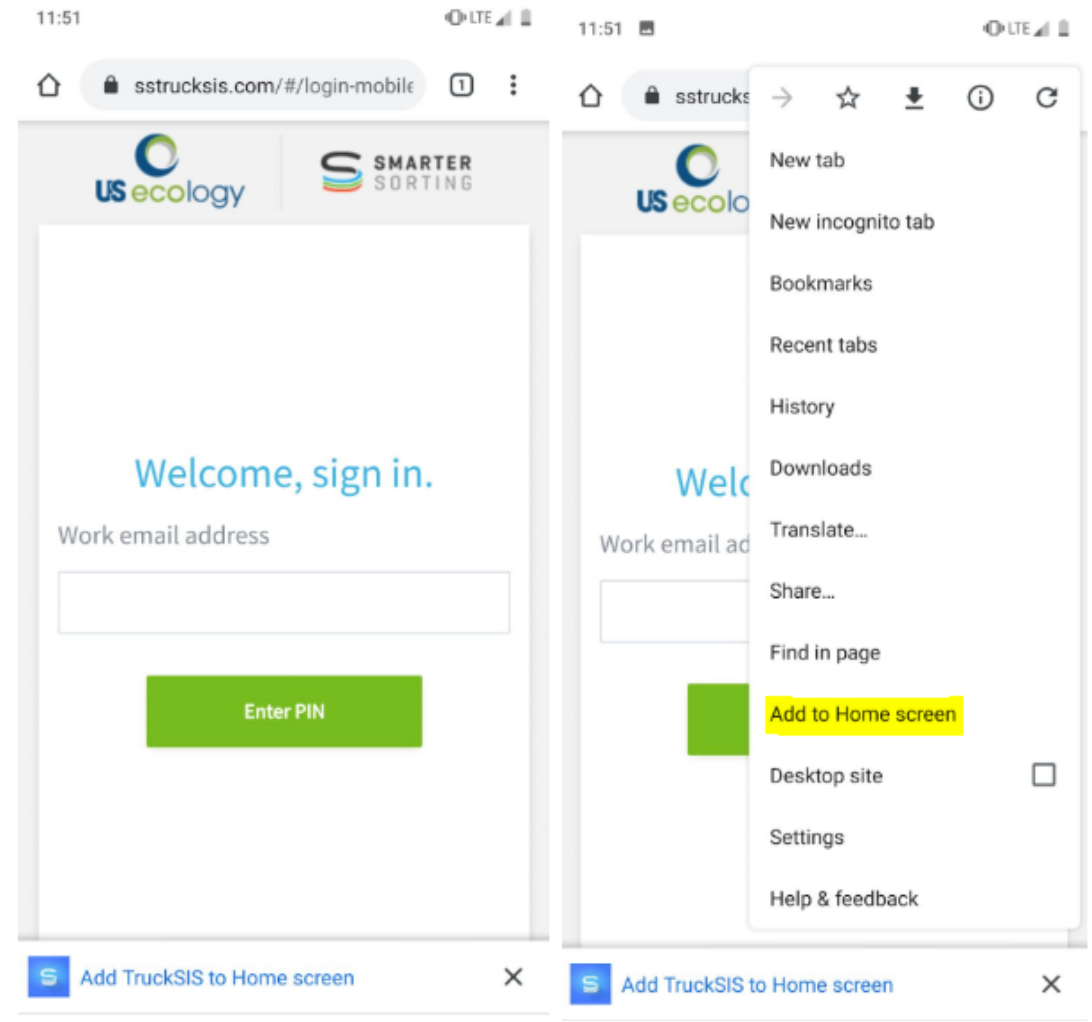
Open Google Chrome on your company Android mobile device and enter:
http://sstrucksis.com
-
Click Add TruckSIS to Home Screen at the bottom of the screen. The app icon will be added to your phone's home screen (or use the 3 dot menu at the top right)
Sign in
- Sign in with your TruckSIS account
- Logout of your TruckSIS account
Sign in whenever you start up a TruckSIS with your email address (login) and 4-digit PIN.
-
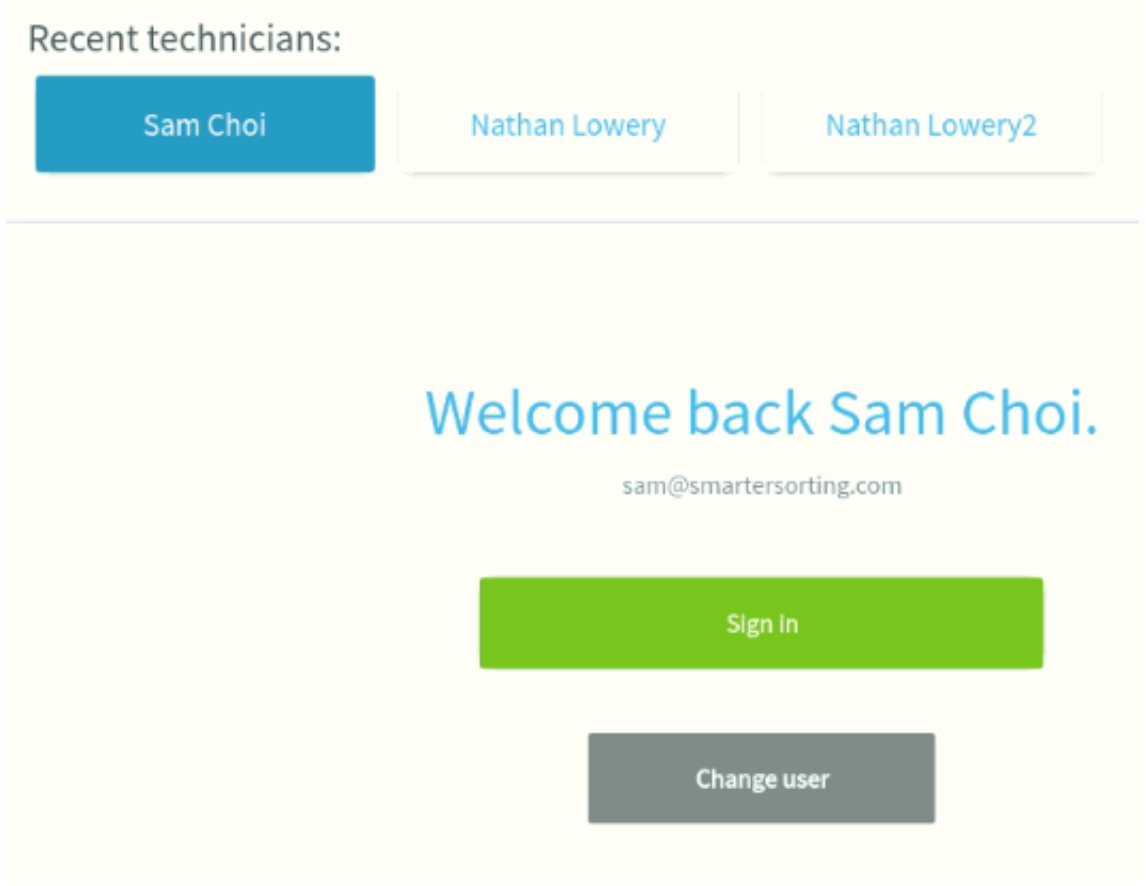
Upon TruckSIS start up, type in your Republic email address or select your name from the Recent technicians list if you’ve already signed in on the device.
-
When you select Sign in, you will be prompted to submit your 4-digit PIN
-
You can select Forgot PIN to receive an email to reset your PIN from
Logout
Select Logout on the left-hand navigation bar from any screen. The system will confirm you want to logout and go back to the Welcome screen.
My trips
- Add a new trip
- View all trip details
- View completed trip
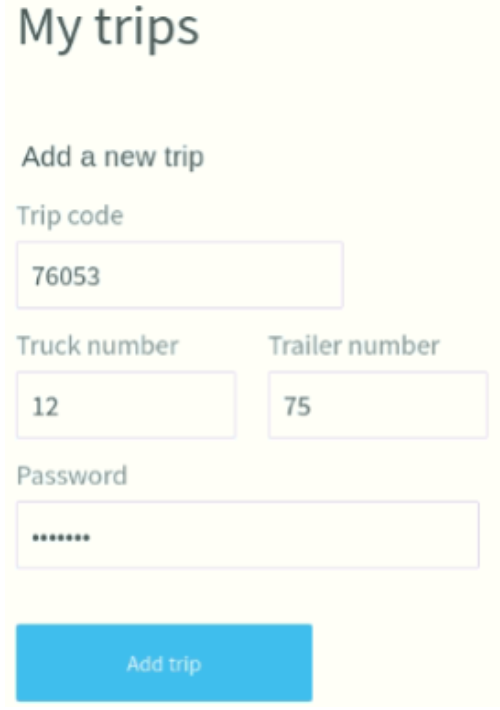
To add a new trip locally to your TruckSIS account you must have the trip code and passcode provided with your trip route.
-
Access My trips on the lefthand navigation.
-
Select Trip code to enter your trip code on the pin pad.
Select Password to enter your trip passcode.
You may also enter your Truck number and Trailer number.
Select Add trip to fetch the trip to your device. The trip card will appear on your trip list.
3. Select View trip to access waste pickups (stops)
View all trip details
Select View all trip details to see a printable view of trips, stops, and custom pickup notes and directions
Completed trips
Completed trips can still be accessed. To access a completed trip, toggle between My trips and Completed trips. You can remove completed trip cards from your device.

Sync trip data
Republic may change details and data about your current trip (e.g. adding approvals, changing document types, etc.) The sync happens automatically, but if for any reason it didn't you can tap Sync Trip to fetch updates on demand.
1. Select Sync trip. The wheel will spin while the TruckSIS searches for an update.
2. If an update is found, the TruckSIS will being Syncing until the system indicates the sync is successful. A sync typically takes 2-5 minutes.
Stops
- Begin a stop
- Undo a stop arrival
- View all stop details for trip
- View completed stops
- Navigate within a stop
Begin stop
Each waste pickup is noted with a stop card that includes all stop details, including services required.
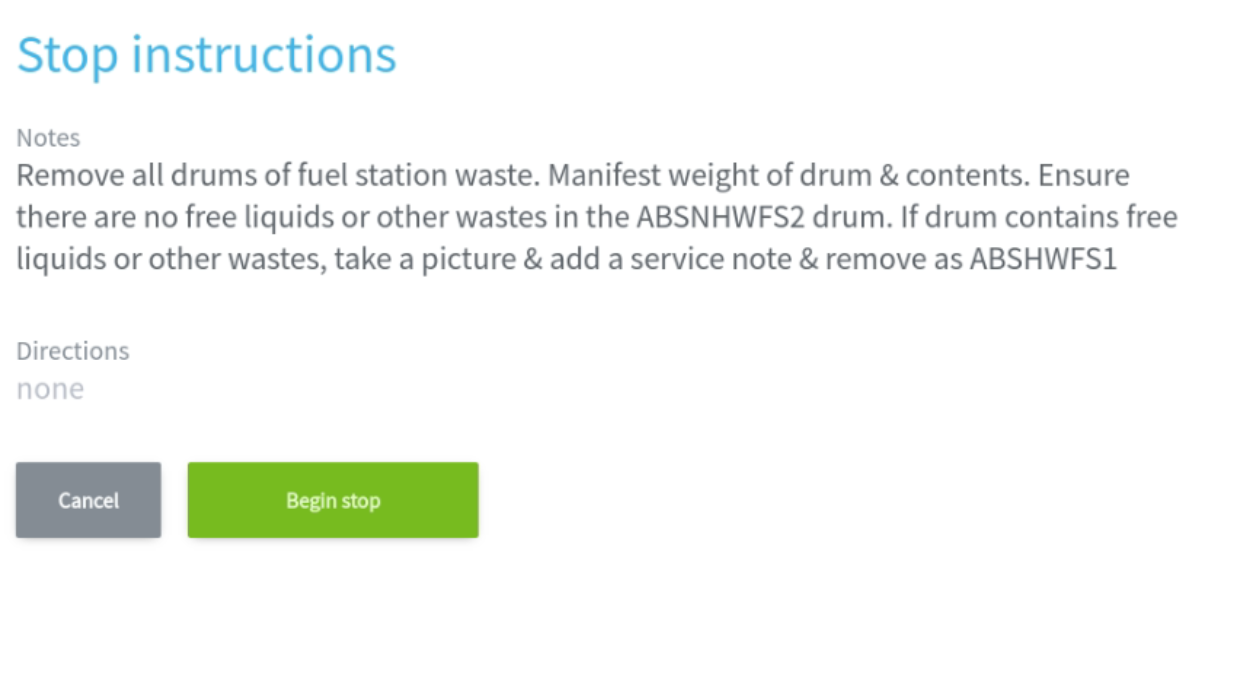
1. To begin a waste pickup, select Begin stop. Any custom notes and directions will appear before you confirm beginning the selected pickup service. Select Begin stop in the Stop instructions pop-up to mark the arrival time.

Undo stop
Your arrival time will be marked once you begin the pickup. You can undo the arrival by selecting Undo. You cannot undo an arrival after creating any data in the active stop.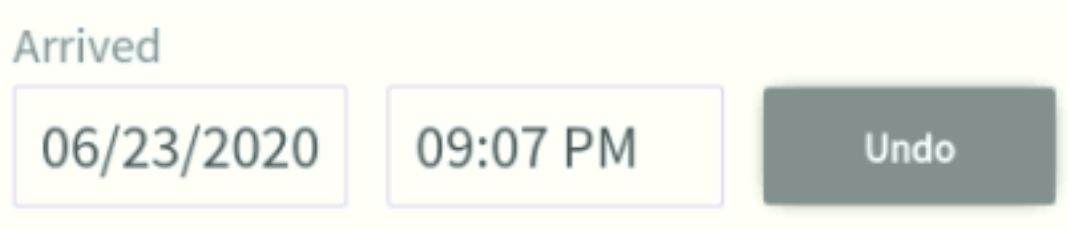
View all stop details
Select View all stop details to see a printable list of all stops and custom notes and directions.
Completed stops
Select Incomplete stops and Completed stops to toggle between stops on your trip. Completed stops can be viewed to print or scan documents and labels.
Stop navigation
All steps within a waste pickup can be navigated with the work queue. Every stop begins on the Sorting tab. Select any section to navigate to specific requirements for the waste service.

Approvals
Add a new approval
To add waste profiles as "approvals" to the current stop, begin on the Sorting tab. 1. Select Add approval. The Approval Builder will appear.
2. Select Assign an approval to navigate all waste profiles available for the current stop.
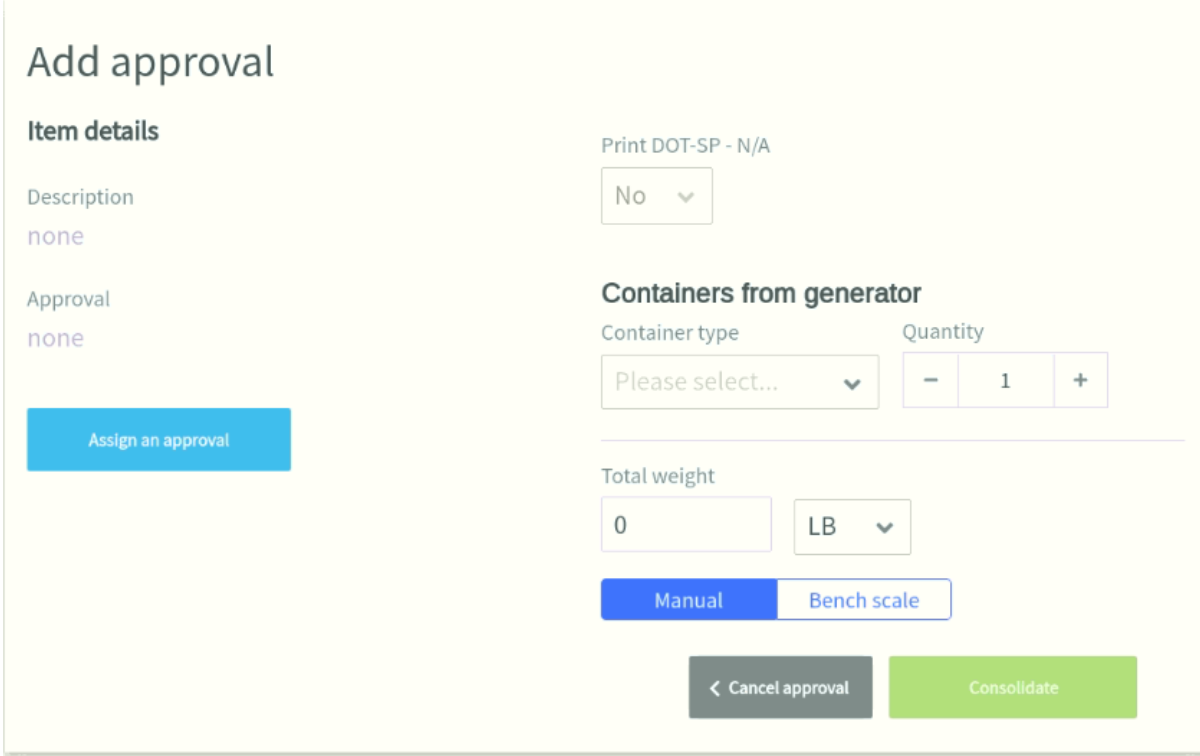
3. Scroll the approval list or search for your approval by typing into the search bar. All approvals listed include the approval description, approval code/name, and document type.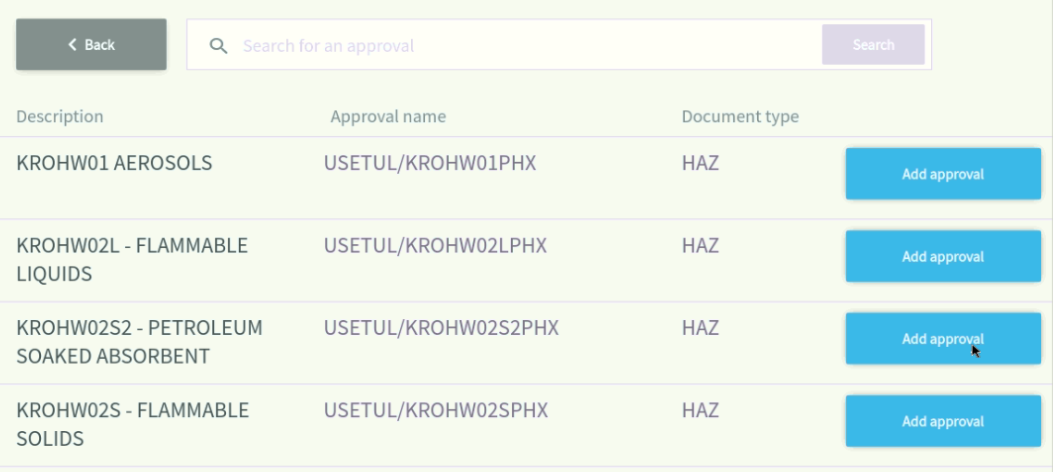
-
Select an approval or Add approval to begin adding that waste profile to the current stop.
-
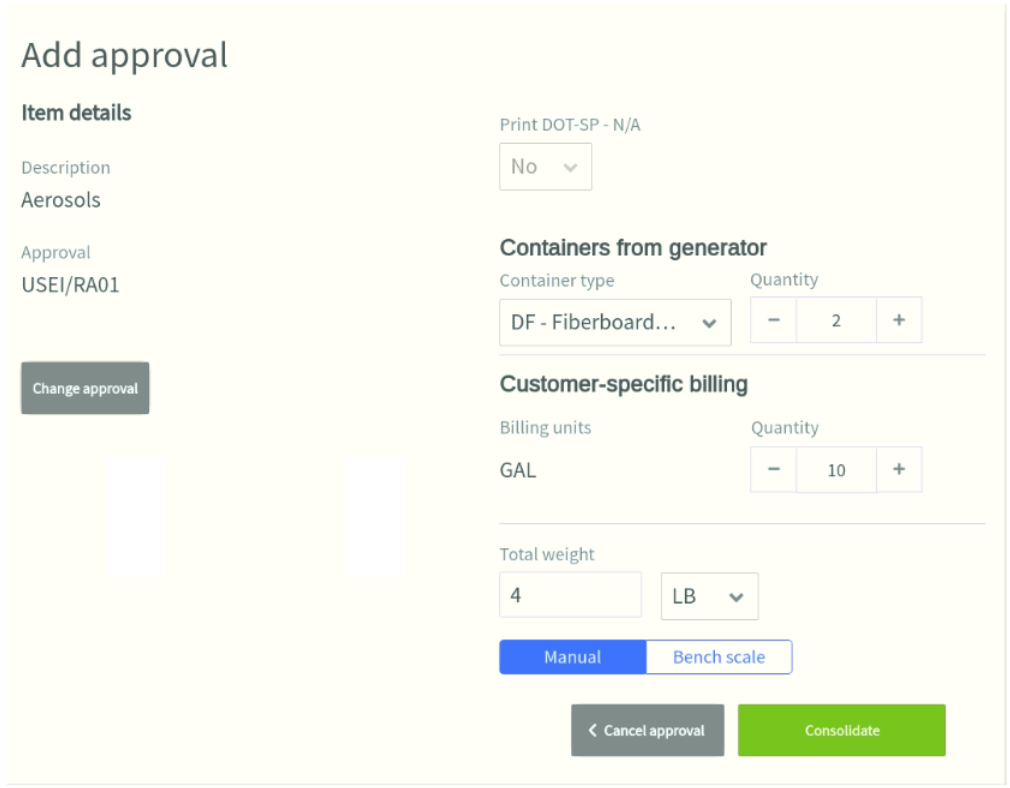
Enter the container type and quantity from the generator. If the approval has customer-specific billing units, add these as well.
-
To enter a total weight, enter a value or use the bench scale to read a weight on the TruckSIS scale.
-
Select Consolidate to complete the approval data and begin consolidating the approval into truck inventory [see Consolidate (CCID)].
Consolidation (CCID)
-
Select Create a new CCID to create a new CCID for the created approval.
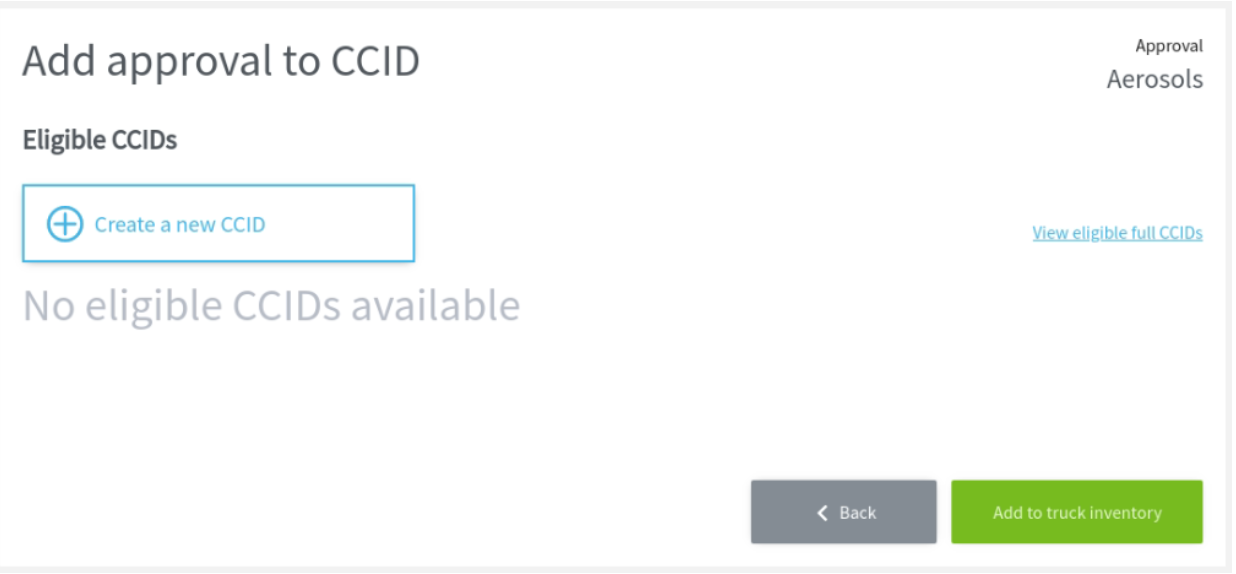
CCIDs are automatically assigned a unique code based on the destination TSDF and numerical order for the trip.
-
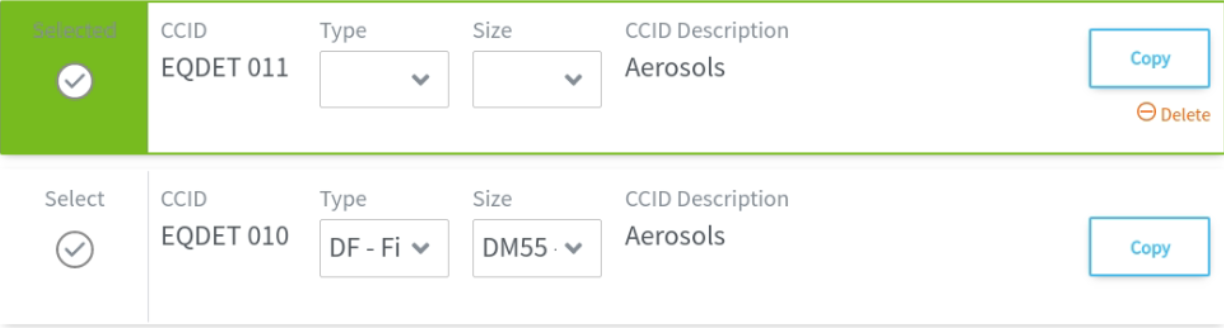
Select a container type and size for the new CCID.

-
Any CCID(s) eligible for approval consolidation will also appear. You can also select or deselect existing CCID(s) to assign the waste profile to the chosen container(s).
-
Select Add to truck inventory to complete adding the waste approval to the stop inventory.
Empty bottles
Adding p-listed empty pharmaceutical bottles
Pharmacy (Rx) waste pickups often include empty bottles with p-listed residue. You can easily add these to your current stop by selecting Add Rx item from the Sorting tab and using the Add p-listed empty bottles feature.
Select Add empty p-listed bottles next to the Rx item search bar. The empty bottle item will appear in the Rx item Builder.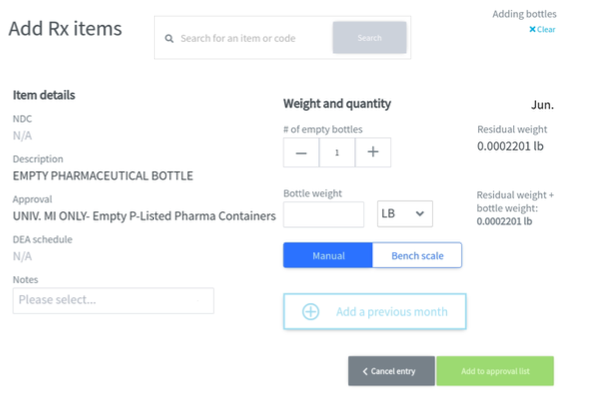
2. Enter a quantity for # of empty bottles. Multiplying # of empty bottles by the residual weight value equals total residual p-listed waste weight.
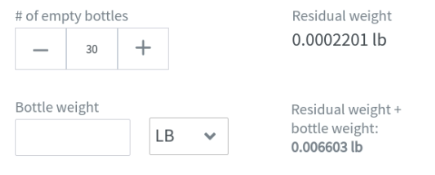
3. Enter a value for Bottle weight if required by the generator. Adding Bottle weight and total residual p-listed waste weight equals the total weight of the empty bottle approval.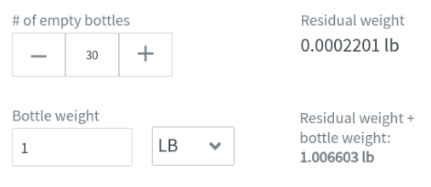
4. Select Add to approval list to create the Empty bottles approval card. You can consolidate this approval when ready by selecting container type and size values, then selecting Consolidate.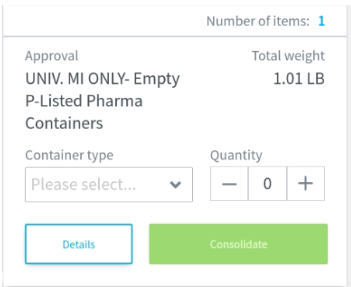
Full inventory pharmacy items (NDCs)
- Adding Rx items / NDCs
- Consolidating Rx approvals
- Adding full inventory pharmacy items (NDCs)
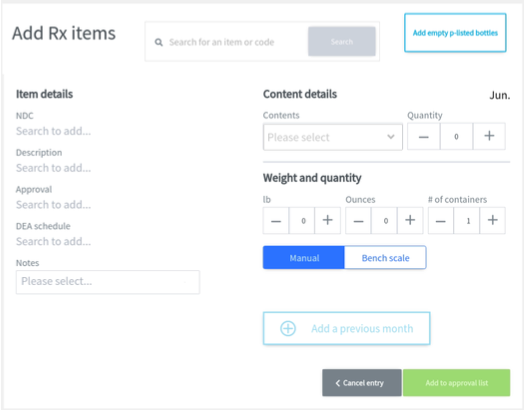
In full inventory states or other regulated instances, pharmacy waste pickups require a record of each drug (pharmacy item) and a printed Pharmaceutical Record of Distribution. You can add pharmacy items to the current stop with the Add Rx item feature.
1. Select Add Rx item to bring up the Rx item Builder. You can search for a pharmacy item by name or by NDC.
-
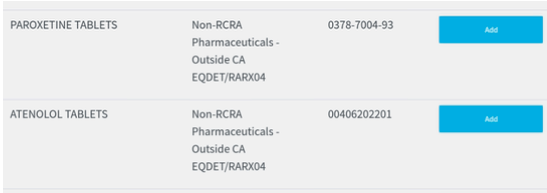
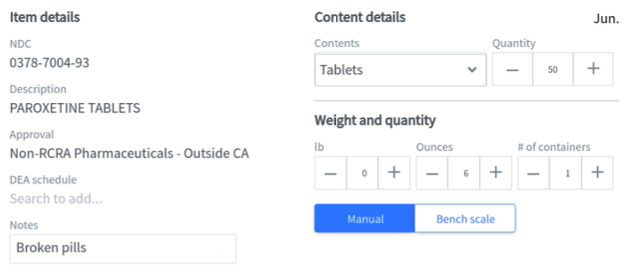
Select the correct pharmacy item from the search results. The drug and approval details will populate on the Rx item Builder.
-
Enter values for Contents, Quantity, Weight, and # of containers.
-
Enter Notes if there are any specific details to record about the pharmacy item. A list of common notes is available.
5. Select Add to approval list to add the pharmacy item to an approval. The approval will appear as a card on the column left of the Rx item Builder.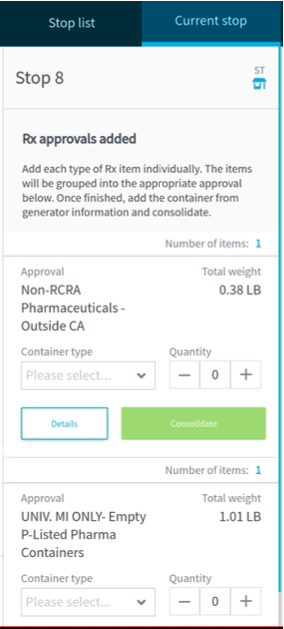
Consolidating Rx approvals
Once all pharmacy items have been added, consolidate all pharmacy approvals. Select a container type and quantity for the approval. Then select Consolidate to go to the CCID flow.
Q&A
Stop questions
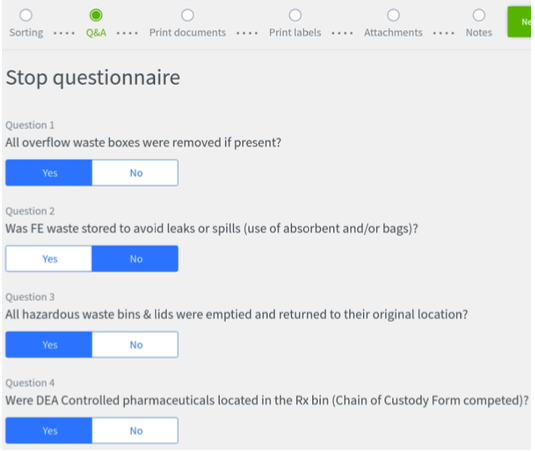
Retail waste pickups usually require the technician to complete a brief question and answer section. Select the Q&A tab on the work queue to begin.
1. Select a response for each question. The answer will save automatically.
Print documents
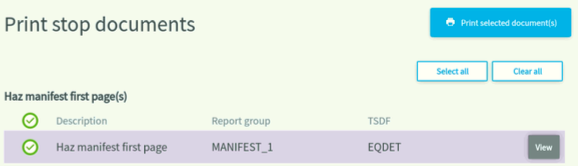
Navigate to Print documents in the work queue to access all documents. Documents are divided into sections based on the type of paper used.
-
Select a single document, multiple documents, a section of documents (by selecting the check mark above the section), or use Select all to select all documents.
-
Select Print selected document(s) to begin printing the chosen documents.
-
The system will ask you to load the correct paper template into the dot matrix printer for the first section of document(s) chosen. When the paper is loaded, select Print document to begin.
4. Manifests print on manifest template paper. All other documents print on blank paper and are labeled Additional documents.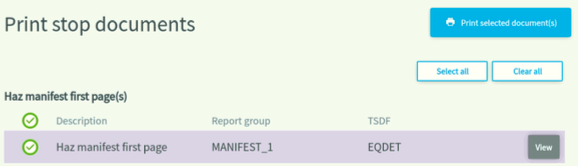
5. Enter the manifest number once a manifest finishes printing. The manifest number will appear in the Report group for applicable documents.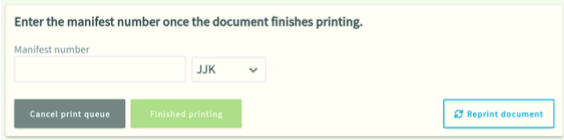
View document PDF
You can view a document before printing by selecting View. A document window will appear showing the document in its current printable state.
Print labels
We are proud to provide an entirely streamlined process for label printing. Instead of dealing with multiple label templates and the dot matrix printer, all labels can be printed instantly using the thermal label printer on the TruckSIS. Navigate to Print labels in the work queue to begin.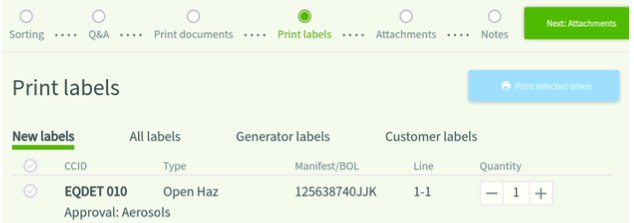
1. Select a hazardous waste container label for the current stop.
2. You can also navigate to All labels to print labels from prior stops on the trip, as well as Generator labels and Customer labels if they exist for the customer.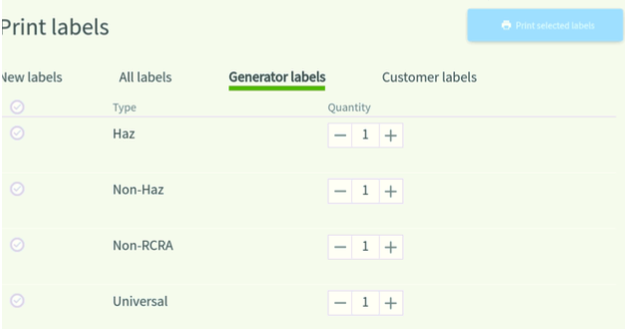
3. Select Print selected labels to instantly print selected label(s).
Please note: Label templates will be different from the MIM. All labels will print on white paper and multicolor label templates are not required.
Scan attachments
You can use the attached wand scanner to scan signed documents and other forms. These attachments will be included in the stop data once the waste pickup is complete. Navigate to Attachments in the work queue to get started.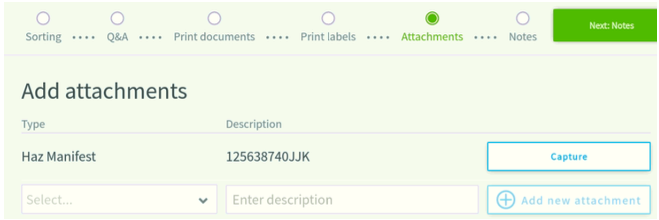
-
Printed documents will appear at the top of the screen (e.g. Haz Manifest). Select Capture to begin the attachment process for the selected document.
-
Hold the document to feed into the top document slot of the wand scanner. You will feel slight feedback once the wand scanner recognizes a document is ready.
-
Select Begin scan to start feeding the document. The scanned document image will appear on the TruckSIS.
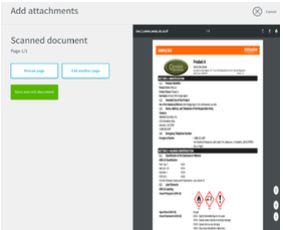
4. You can also add a custom attachment by selecting a Type and entering a Description. Then, select Add new attachment and follow the above instructions on scanning a document.
Photo attachments
Capture photos at a stop
Some retail pickups require a photograph to be captured at each site (e.g. a photo of the waste accumulation area, etc.) Technicians can take photos as needed on the TruckSIS Mobile App. To get started, open the mobile app and select Add images.
1. Select Add an image to bring up the phone camera.
2. Capture an image and save it to the stop on your mobile device by entering a Type and Description.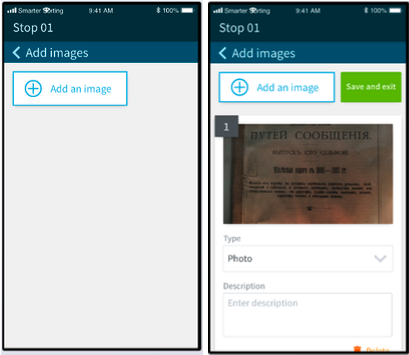
3. When you are complete taking photos, select Save and exit.
4. When you are in range of the TruckSIS wifi with your TruckSIS mobile app open, the photo attachments will automatically sync from the mobile app to the TruckSIS. You will be able to view them in Attachments.
Notes
Technicians can enter common stop notes or custom notes to add details about a pickup. Navigate to Notes in the work queue to begin.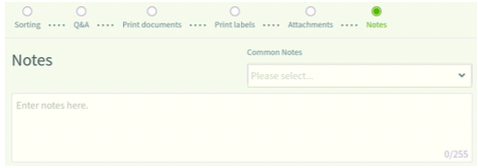
1. Select the text box to bring up the keyboard. You can enter any notes in this section.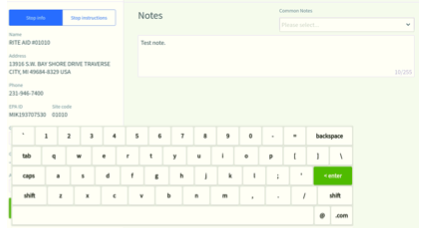
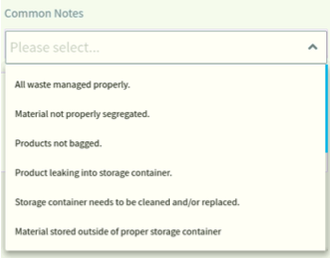
2. Select the Common Notes dropdown to view a list of common stop notes. Select a common note and it will paste in the text box.
Completing a stop
Enter generator sign name
Enter a generator sign name by selecting the field on the left side of the screen. Entering a name will create the sign date as the current date.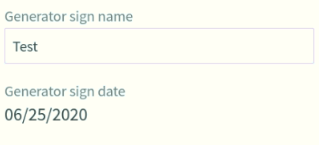
Completing a stop
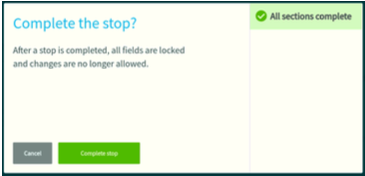
The Complete stop feature is located on the bottom left of the screen in any stop.
1. Select Complete stop. The TruckSIS will confirm that all required steps are completed. Required steps include: entering a manifest tracking number, entering a generator sign name, Q&A.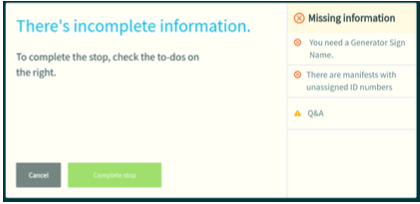
2. Once all necessary steps are completed, confirm Complete stop to mark the stop completion time and go back to the stop list.
Appendix I: Product UPC Scan Test
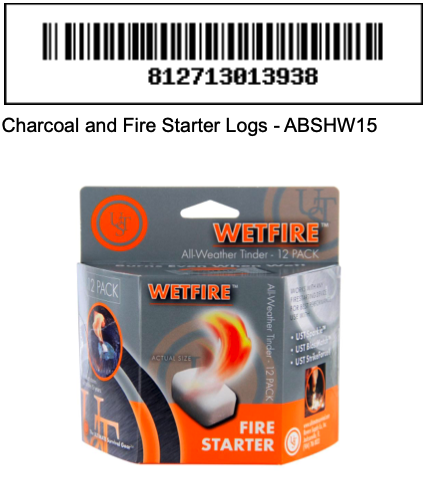
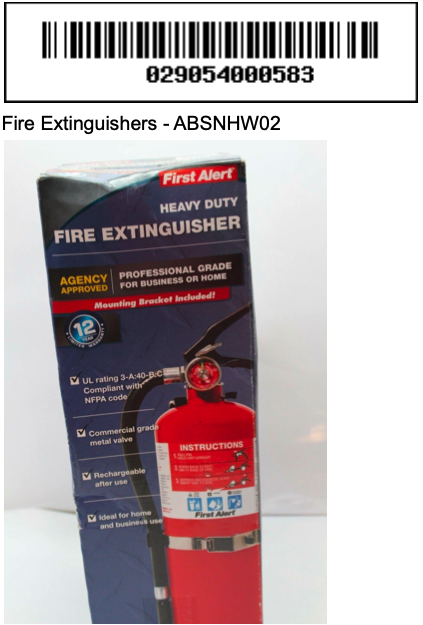
Currently, these 3 products can be scanned for the TRAINING TRIP Albertson’s stops.
-
● Start a waste pickup at Albertsons FE/Store (e.g. Safeway)
-
● Select Identify items on the top right of the screen
-
● Use the barcode scanner to scan each barcode
WetFire Tinder
812713013938
FIRE EXTINGUISHER 5LB
029054000583
Fire Extinguishers - ABSNHW02
Clorox Outdoor Bleach (PR)
044600971247
Bleach - ABSHW05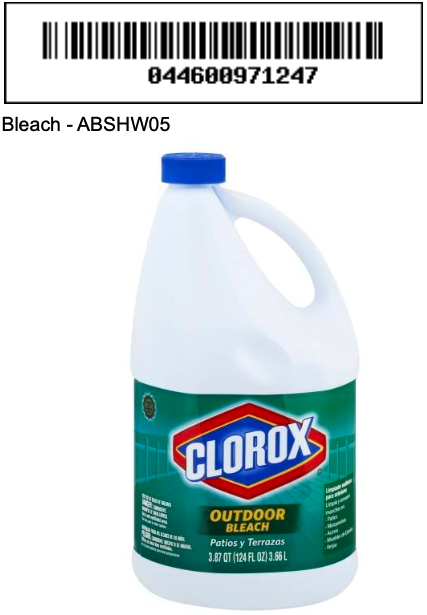
RESET BARCODES FOR ZEBRA SCAN GUN
● Use only if instructed by SUPPORT
● Scan all codes top to bottom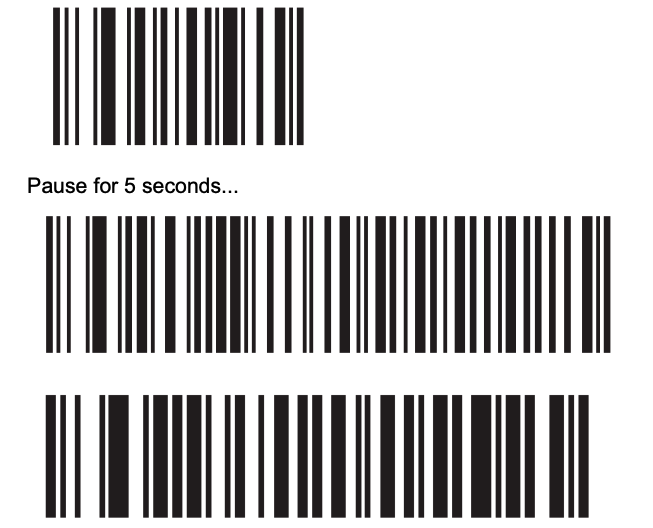

Still stuck? Contact support or email support@smartersorting.com Either way it lands straight in our ticket queue.